
1、OSSEC简介
OSSEC是一款开源的基于主机的入侵检测系统,可以简称为HIDS。它具备日志分析,文件完整性检查,策略监控,rootkit检测,实时报警以及联动响应等功能。它支持多种操作系统:Linux、Windows、MacOS、Solaris、HP-UX、AIX。属于企业安全之利器。
详细的介绍和文档可以参考官网网站: http://www.ossec.net/
2、环境准备
主机名
IP地址
部署服务
版本
ossec-server
192.168.100.160
ossec server
3.7.0
ossec-agent01
192.168.100.161
ossec-agent01
3.7.0
ossec-agent02
192.168.100.162
ossec-agent02
3.7.0
3、OSSEC Server部署
| 主机名 | IP地址 | 部署服务 | 版本 |
| ossec-server | 192.168.100.160 | ossec server | 3.7.0 |
| ossec-agent01 | 192.168.100.161 | ossec-agent01 | 3.7.0 |
| ossec-agent02 | 192.168.100.162 | ossec-agent02 | 3.7.0 |
2.1安装依赖包
[root@oessec-server ~]# yum -y install zlib-devel pcre2-devel make gcc sqlite-devel openssl-devel libevent-devel systemd-devel2.2 对于可选的数据库支持,添加包 mysql-devel 和/或 postgresql-devel 包
[root@oessec-server ~]# yum -y install mysql-devel postgresql-devel2.3 下载OSSEC
[root@oessec-server ~]# git clone https://github.com/ossec/ossec-hids.git2.4 运行安装脚本
[root@oessec-server ~]# cd ossec-hids/
[root@oessec-server ossec-hids]# ./install.sh
which: no host in (/usr/local/sbin:/usr/local/bin:/usr/sbin:/usr/bin:/root/bin)
  ** Para instalação em português, escolha [br].
  ** 要使用中文进行安装, 请选择 [cn].
  ** Fur eine deutsche Installation wohlen Sie [de].
  ** Για εγκατάσταση στα Ελληνικά, επιλέξτε [el].
  ** For installation in English, choose [en].
  ** Para instalar en Español , eliga [es].
  ** Pour une installation en français, choisissez [fr]
  ** A Magyar nyelvű telepítéshez válassza [hu].
  ** Per l'installazione in Italiano, scegli [it].
  ** 日本語でインストールします.選択して下さい.[jp].
  ** Voor installatie in het Nederlands, kies [nl].
  ** Aby instalować w języku Polskim, wybierz [pl].
  ** Для инструкций по установке на русском ,введите [ru].
  ** Za instalaciju na srpskom, izaberi [sr].
  ** Türkçe kurulum için seçin [tr].
  (en/br/cn/de/el/es/fr/hu/it/jp/nl/pl/ru/sr/tr) [en]: cn
which: no host in (/usr/local/sbin:/usr/local/bin:/usr/sbin:/usr/bin:/root/bin)

 OSSEC HIDS v3.7.0 安装脚本 - http://www.ossec.net

 您将开始 OSSEC HIDS 的安装.
 请确认在您的机器上已经正确安装了 C 编译器.

  - 系统类型: Linux oessec-server 3.10.0-1160.el7.x86_64
  - 用户: root
  - 主机: oessec-server


  -- 按 ENTER 继续或 Ctrl-C 退出. --


1- 您希望哪一种安装 (server, agent, local or help)? server

  - 选择了 Server 类型的安装.

2- 正在初始化安装环境.

 - 请选择 OSSEC HIDS 的安装路径 [/var/ossec]:

    - OSSEC HIDS 将安装在  /var/ossec .

3- 正在配置 OSSEC HIDS.

  3.1- 您希望收到e-mail告警吗? (y/n) [y]: y
   - 请输入您的 e-mail 地址? chenjiangfeng@accesscorporate.com.cn
   - 请输入您的 SMTP 服务器IP或主机名 ? partner.outlook.cn

  3.2- 您希望运行系统完整性检测模块吗? (y/n) [y]: y

   - 系统完整性检测模块将被部署.

  3.3- 您希望运行 rootkit检测吗? (y/n) [y]: y

   - rootkit检测将被部署.

  3.4- 关联响应允许您在分析已接收事件的基础上执行一个
       已定义的命令.
       例如,你可以阻止某个IP地址的访问或禁止某个用户的访问权限.
       更多的信息,您可以访问:
       http://www.ossec.net/docs/docs/manual/ar/index.html
   - 您希望开启联动(active response)功能吗? (y/n) [y]: y


     - 关联响应已开启

   - 默认情况下, 我们开启了主机拒绝和防火墙拒绝两种响应.
     第一种情况将添加一个主机到 /etc/hosts.deny.
     第二种情况将在iptables(linux)或ipfilter(Solaris,
     FreeBSD 或 NetBSD)中拒绝该主机的访问.
   - 该功能可以用以阻止 SSHD 暴力攻击, 端口扫描和其他
     一些形式的攻击. 同样你也可以将他们添加到其他地方,
     例如将他们添加为 snort 的事件.

   - 您希望开启防火墙联动(firewall-drop)功能吗? (y/n) [y]: n^H

     - 防火墙联动(firewall-drop)当事件级别 >= 6 时被启动

   -
      - 172.20.230.237

   - 您希望添加更多的IP到白名单吗? (y/n)? [n]:

  3.5- 您希望接收远程机器syslog吗 (port 514 udp)? (y/n) [y]: y

   - 远程机器syslog将被接收.

  3.6- 设置配置文件以分析一下日志:
    -- /var/log/messages
    -- /var/log/secure
    -- /var/log/maillog


 -如果你希望监控其他文件, 只需要在配置文件ossec.conf中
  添加新的一项.
  任何关于配置的疑问您都可以在 http://www.ossec.net 找到答案.


  --- 按 ENTER 以继续 ---


5- 正在安装系统
 - 正在运行Makefile
。。。。。。。
install -m 0550 -o root -g 0 clear_stats /var/ossec/bin/
install -m 0550 -o root -g 0 list_agents /var/ossec/bin/
install -m 0550 -o root -g 0 ossec-regex /var/ossec/bin/
install -m 0550 -o root -g 0 syscheck_update /var/ossec/bin/
install -m 0550 -o root -g 0 agent_control /var/ossec/bin/
install -m 0550 -o root -g 0 syscheck_control /var/ossec/bin/
install -m 0550 -o root -g 0 rootcheck_control /var/ossec/bin/
install -m 0750 -o ossec -g ossec -d /var/ossec/stats
install -m 0550 -o root -g ossec -d /var/ossec/rules
install -m 0640 -o root -g ossec -b ../etc/rules/*.xml /var/ossec/rules
install -m 0750 -o ossec -g ossec -d /var/ossec/queue/fts
install -m 0750 -o ossec -g ossec -d /var/ossec/queue/rootcheck
install -m 0750 -o ossecr -g ossec -d /var/ossec/queue/agent-info
install -m 0750 -o ossec -g ossec -d /var/ossec/queue/agentless
install -m 0750 -o ossecr -g ossec -d /var/ossec/queue/rids
install -m 0640 -o root -g ossec ../etc/decoder.xml /var/ossec/etc/
rm -f /var/ossec/etc/shared/merged.mg
 - 系统类型是  Redhat Linux.
 - 修改启动脚本使 OSSEC HIDS 在系统启动时自动运行
 - 已正确完成系统配置.
 - 要启动 OSSEC HIDS:
      /var/ossec/bin/ossec-control start
 - 要停止 OSSEC HIDS:
      /var/ossec/bin/ossec-control stop
 - 要查看或修改系统配置,请编辑  /var/ossec/etc/ossec.conf
    感谢使用 OSSEC HIDS.
    如果您有任何疑问,建议或您找到任何bug,
    请通过 contact@ossec.net 或邮件列表 ossec-list@ossec.net 联系我们.
    ( http://www.ossec.net/en/mailing_lists.html ).
    您可以在 http://www.ossec.net 获得更多信息
    --- 请按 ENTER 结束安装 (下面可能有更多信息). ---
 - 为使代理能够联接服务器端, 您需要将每个代理添加到服务器.
   允许'manage_agents'来添加活删除代理:
   /var/ossec/bin/manage_agents
   详细信息请参考:
   http://www.ossec.net/docs/docs/programs/manage_agents.html
编辑配置文件etc/ossec.conf 在<remote>标签下添加<allowed-ips>any</allowed-ips>,以允许任何IP,详细配置如下
  <remote>
    <connection>syslog</connection>
    <allowed-ips>any</allowed-ips>
  </remote>

  <remote>
    <connection>secure</connection>
    <allowed-ips>any</allowed-ips>
  </remote>
重启ossec服务进行生效
[root@Centos ossec-hids-2.8.1]# /var/ossec/bin/ossec-control restart
如果长期存储,可以配置MySQL服务
安装数据库
yum install mariadb-server

mysql_secure_installation
netstat -anp | grep 3306
创建数据库
mysql -uroot -pMySQL_2022

create database ossec;
grant INSERT,SELECT,UPDATE,CREATE,DELETE,EXECUTE on ossec.* to ossec@localhost;
set password for ossec@localhost=PASSWORD('password');
flush privileges;
启动mysql服务
systemctl start mariadb
systemctl enable mariadb
导入MySQL表结构到MySQL中:
mysql -u ossec -p ossec < ./src/os_dbd/mysql.schema安装好服务端之后,还需要配置,执行下面命令启用数据库支持:
/var/ossec/bin/ossec-control enable database修改部分配置文件的权限,否则会启动服务失败:
[root@Centos ossec-hids-2.8.1]# chmod u+w /var/ossec/etc/ossec.conf
编辑ossec.conf文件,在ossec_config文件中添加mysql配置
<ossec_config>
  <database_output>
    <hostname>192.168.30.130</hostname>
    <username>ossec</username>
    <password>ossec</password>
    <database>ossec</database>
    <type>mysql</type>
  </database_output>
</ossec_config>
重启ossec服务进行生效
[root@Centos ossec-hids-2.8.1]# /var/ossec/bin/ossec-control restart
添加ossec客户端并导出Key
在服务器上添加客户端,执行如下命令,按照提示进行输入,红色部分是我们输入的:
[root@ossec-server ossec-hids]# /var/ossec/bin/manage_agents


****************************************
* OSSEC HIDS v3.7.0 Agent manager.     *
* The following options are available: *
****************************************
   (A)dd an agent (A).
   (E)xtract key for an agent (E).
   (L)ist already added agents (L).
   (R)emove an agent (R).
   (Q)uit.
Choose your action: A,E,L,R or Q: A

- Adding a new agent (use '\q' to return to the main menu).
  Please provide the following:
   * A name for the new agent:

** Invalid name '' given. Name must contain only alphanumeric characters (min=2, max=32).

   * A name for the new agent: 3.7
   * The IP Address of the new agent: 172.20.121.250
   * An ID for the new agent[001]:
Agent information:
   ID:001
   Name:3.7
   IP Address:172.20.121.250

Confirm adding it?(y/n): y
Agent added with ID 001.


****************************************
* OSSEC HIDS v3.7.0 Agent manager.     *
* The following options are available: *
****************************************
   (A)dd an agent (A).
   (E)xtract key for an agent (E).
   (L)ist already added agents (L).
   (R)emove an agent (R).
   (Q)uit.
Choose your action: A,E,L,R or Q: E

Available agents:
   ID: 001, Name: 3.7, IP: 172.20.121.250
Provide the ID of the agent to extract the key (or '\q' to quit):

** Invalid ID '' given. ID is not present.
Provide the ID of the agent to extract the key (or '\q' to quit): 001

Agent key information for '001' is:
MDAxIDMuNyAxNzIuMjAuMTIxLjI1MCBjYTk1YWNkZmM2YmJkYTY2NTEwNDA5MDI2NDBiYzc0NTU4MDA4YmZlZTBjZDZlNDUyN2E4ZTc1ZmJkYmJmODYy

** Press ENTER to return to the main menu.


****************************************
* OSSEC HIDS v3.7.0 Agent manager.     *
* The following options are available: *
****************************************
   (A)dd an agent (A).
   (E)xtract key for an agent (E).
   (L)ist already added agents (L).
   (R)emove an agent (R).
   (Q)uit.
Choose your action: A,E,L,R or Q: Q

** You must restart OSSEC for your changes to take effect.

manage_agents: Exiting.
manage_agents: Exiting.
[root@ossec-server ossec-hids]#
Key的作用是在客户端中导入并使得服务端与客户端达到联动的效果,这里记得把密钥复制一下保存起来。
查看ossec服务端的状态
/var/ossec/bin/agent_control -lc3、OSSEC Agent 部署(Linux)
3.1安装依赖包
[root@ossec-agent ~]# yum -y install zlib-devel pcre2-devel make gcc sqlite-devel openssl-devel libevent-devel systemd-devel3.2 对于可选的数据库支持,添加包 mysql-devel 和/或 postgresql-devel 包
[root@ossec-agent ~]# yum -y install mysql-devel postgresql-devel3.3 下载OSSEC
[root@ossec-agent ~]# git clone https://github.com/ossec/ossec-hids.git
3.4 运行安装脚本
[root@ossec-agent ~]# cd ossec-hids/
[root@ossec-agent ossec-hids]# ./install.sh
which: no host in (/usr/local/sbin:/usr/local/bin:/usr/sbin:/usr/bin:/root/bin)

  ** Para instalação em português, escolha [br].
  ** 要使用中文进行安装, 请选择 [cn].
  ** Fur eine deutsche Installation wohlen Sie [de].
  ** Για εγκατάσταση στα Ελληνικά, επιλέξτε [el].
  ** For installation in English, choose [en].
  ** Para instalar en Español , eliga [es].
  ** Pour une installation en français, choisissez [fr]
  ** A Magyar nyelvű telepítéshez válassza [hu].
  ** Per l'installazione in Italiano, scegli [it].
  ** 日本語でインストールします.選択して下さい.[jp].
  ** Voor installatie in het Nederlands, kies [nl].
  ** Aby instalować w języku Polskim, wybierz [pl].
  ** Для инструкций по установке на русском ,введите [ru].
  ** Za instalaciju na srpskom, izaberi [sr].
  ** Türkçe kurulum için seçin [tr].
  (en/br/cn/de/el/es/fr/hu/it/jp/nl/pl/ru/sr/tr) [en]: cn
which: no host in (/usr/local/sbin:/usr/local/bin:/usr/sbin:/usr/bin:/root/bin)
 OSSEC HIDS v3.7.0 安装脚本 - http://www.ossec.net

 您将开始 OSSEC HIDS 的安装.
 请确认在您的机器上已经正确安装了 C 编译器.

  - 系统类型: Linux ossec-agent 3.10.0-1160.el7.x86_64
  - 用户: root
  - 主机: ossec-agent


  -- 按 ENTER 继续或 Ctrl-C 退出. --


1- 您希望哪一种安装 (server, agent, local or help)? agent

  - 选择了 Agent(client) 类型的安装.

2- 正在初始化安装环境.

 - 请选择 OSSEC HIDS 的安装路径 [/var/ossec]:

    - OSSEC HIDS 将安装在  /var/ossec .

3- 正在配置 OSSEC HIDS.

  3.1- 请输入 OSSEC HIDS 服务器的IP地址或主机名: 172.20.121.250

   - 添加服务器主机名  172.20.121.250

  3.2- 您希望运行系统完整性检测模块吗? (y/n) [y]: y

   - 系统完整性检测模块将被部署.

  3.3- 您希望运行 rootkit检测吗? (y/n) [y]: y

   - rootkit检测将被部署.

  3.4 - 您希望开启联动(active response)功能吗? (y/n) [y]: y


  3.5- 设置配置文件以分析一下日志:
    -- /var/log/messages
    -- /var/log/secure
    -- /var/log/maillog


 -如果你希望监控其他文件, 只需要在配置文件ossec.conf中
  添加新的一项.
  任何关于配置的疑问您都可以在 http://www.ossec.net 找到答案.


  --- 按 ENTER 以继续 ---


5- 正在安装系统
 - 正在运行Makefile
3.5 配置agent
[root@ossec-agent ossec-hids]# cd /var/ossec/bin/
[root@ossec-agent bin]# ./manage_agents


****************************************
* OSSEC HIDS v3.7.0 Agent manager.     *
* The following options are available: *
****************************************
   (I)mport key from the server (I).
   (Q)uit.
Choose your action: I or Q: I

* Provide the Key generated by the server.
* The best approach is to cut and paste it.
*** OBS: Do not include spaces or new lines.

Paste it here (or '\q' to quit): MDAyIDE3Mi4yMC4xMjEuMjQ5IDE3Mi4yMC4xMjEuMjQ5IGY5NTc1ODQ5NDBkMTZhMDI4NDViNjg0MWYxMjdhYzcxOTFlOTFiMmRmZGE1MDZmM2MwYmYzZmZkMTYyOTM3MzQ=

Agent information:
   ID:002
   Name:172.20.121.249
   IP Address:172.20.121.249

Confirm adding it?(y/n): y
Added.
** Press ENTER to return to the main menu.


****************************************
* OSSEC HIDS v3.7.0 Agent manager.     *
* The following options are available: *
****************************************
   (I)mport key from the server (I).
   (Q)uit.
Choose your action: I or Q: q

** You must restart OSSEC for your changes to take effect.

manage_agents: Exiting.
manage_agents: Exiting.
[root@ossec-agent bin]#
4、OSSEC Agent 部署(Windows)
5、检查agent是否上线
[root@ossec-server bin]# ./agent_control -lc

OSSEC HIDS agent_control. List of available agents:
   ID: 000, Name: ossec-server (server), IP: 127.0.0.1, Active/Local
   ID: 001, Name: agent01, IP: 192.168.100.161, Active
   ID: 002, Name: agent02, IP: 192.168.100.162, Active
6、配置web界面
1. 安装Apache服务
[root@ossec-server ~]# yum -y install php php-mysql libapache-mod-php httpd wget gcc make httpd php php-mysql sendmail
2. 下载软件包
[root@ossec-server ~]# git clone https://github.com/ossec/ossec-wui.git
3.将文件夹移动到可以通过以下方式访问的地方
[root@ossec-server ~]# mv ossec-wui* /var/www/html/ossec-wui
4. 运行设置脚本(分配用户名/密码…):
[root@ossec-server ossec-wui]# ./setup.sh
Setting up ossec ui...

Username: admin
New password:
Re-type new password:
Adding password for user admin
Enter your web server user name (e.g. apache, www, nobody, www-data, ...)
apache
You must restart your web server after this setup is done.

Setup completed successfully.
[root@ossec-server ossec-wui]#
5. 配置虚拟主机
vim /etc/httpd/conf.d/ossec.conf

Alias ossec/ "/var/www/html/ossec/"
<Directory "/var/www/html/ossec/">
AuthName "OSSEC AUTH"
Require valid-user
AuthType Basic
AuthUserFile /var/www/html/ossec/.htpasswd
</Directory>
重启Apache服务
systemctl restart httpd
浏览器查看
 配置CEF日志转发到Graylog
测试SSH暴力破解
配置暴露破解
被自动封禁
集成ELK分析
配置CEF日志转发到Graylog
测试SSH暴力破解
配置暴露破解
被自动封禁
集成ELK分析
[root@ossec-server bin]# ./agent_control -lc
OSSEC HIDS agent_control. List of available agents:
ID: 000, Name: ossec-server (server), IP: 127.0.0.1, Active/Local
ID: 001, Name: agent01, IP: 192.168.100.161, Active
ID: 002, Name: agent02, IP: 192.168.100.162, Active
[root@ossec-server ~]# yum -y install php php-mysql libapache-mod-php httpd wget gcc make httpd php php-mysql sendmail
[root@ossec-server ~]# git clone https://github.com/ossec/ossec-wui.git
[root@ossec-server ~]# mv ossec-wui* /var/www/html/ossec-wui
[root@ossec-server ossec-wui]# ./setup.sh
Setting up ossec ui...
Username: admin
New password:
Re-type new password:
Adding password for user admin
Enter your web server user name (e.g. apache, www, nobody, www-data, ...)
apache
You must restart your web server after this setup is done.
Setup completed successfully.
[root@ossec-server ossec-wui]# vim /etc/httpd/conf.d/ossec.conf
Alias ossec/ "/var/www/html/ossec/"
<Directory "/var/www/html/ossec/">
AuthName "OSSEC AUTH"
Require valid-user
AuthType Basic
AuthUserFile /var/www/html/ossec/.htpasswd
</Directory>systemctl restart httpd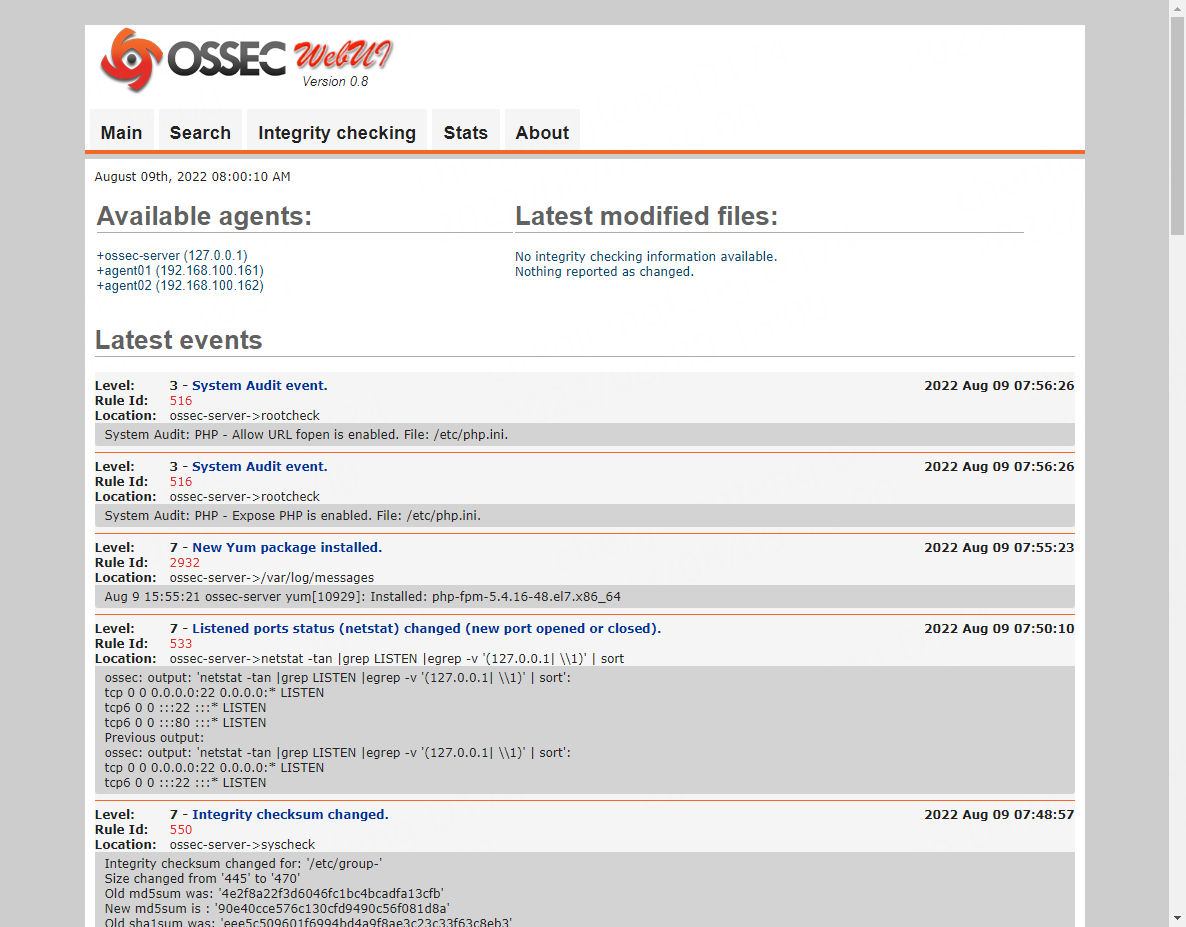

被自动封禁

© 版权声明
本站所有内容(包括但不限于文字、图片、视频等)均受到版权法保护,归作者所有,未经授权不得转载、复制或用于其他任何商业目的。 转载请注明出处,并保留原文链接。对于未经授权的使用,我们将保留追究法律责任的权利。
THE END


暂无评论内容